ADK (Build with AI)
ADK Setup Guide
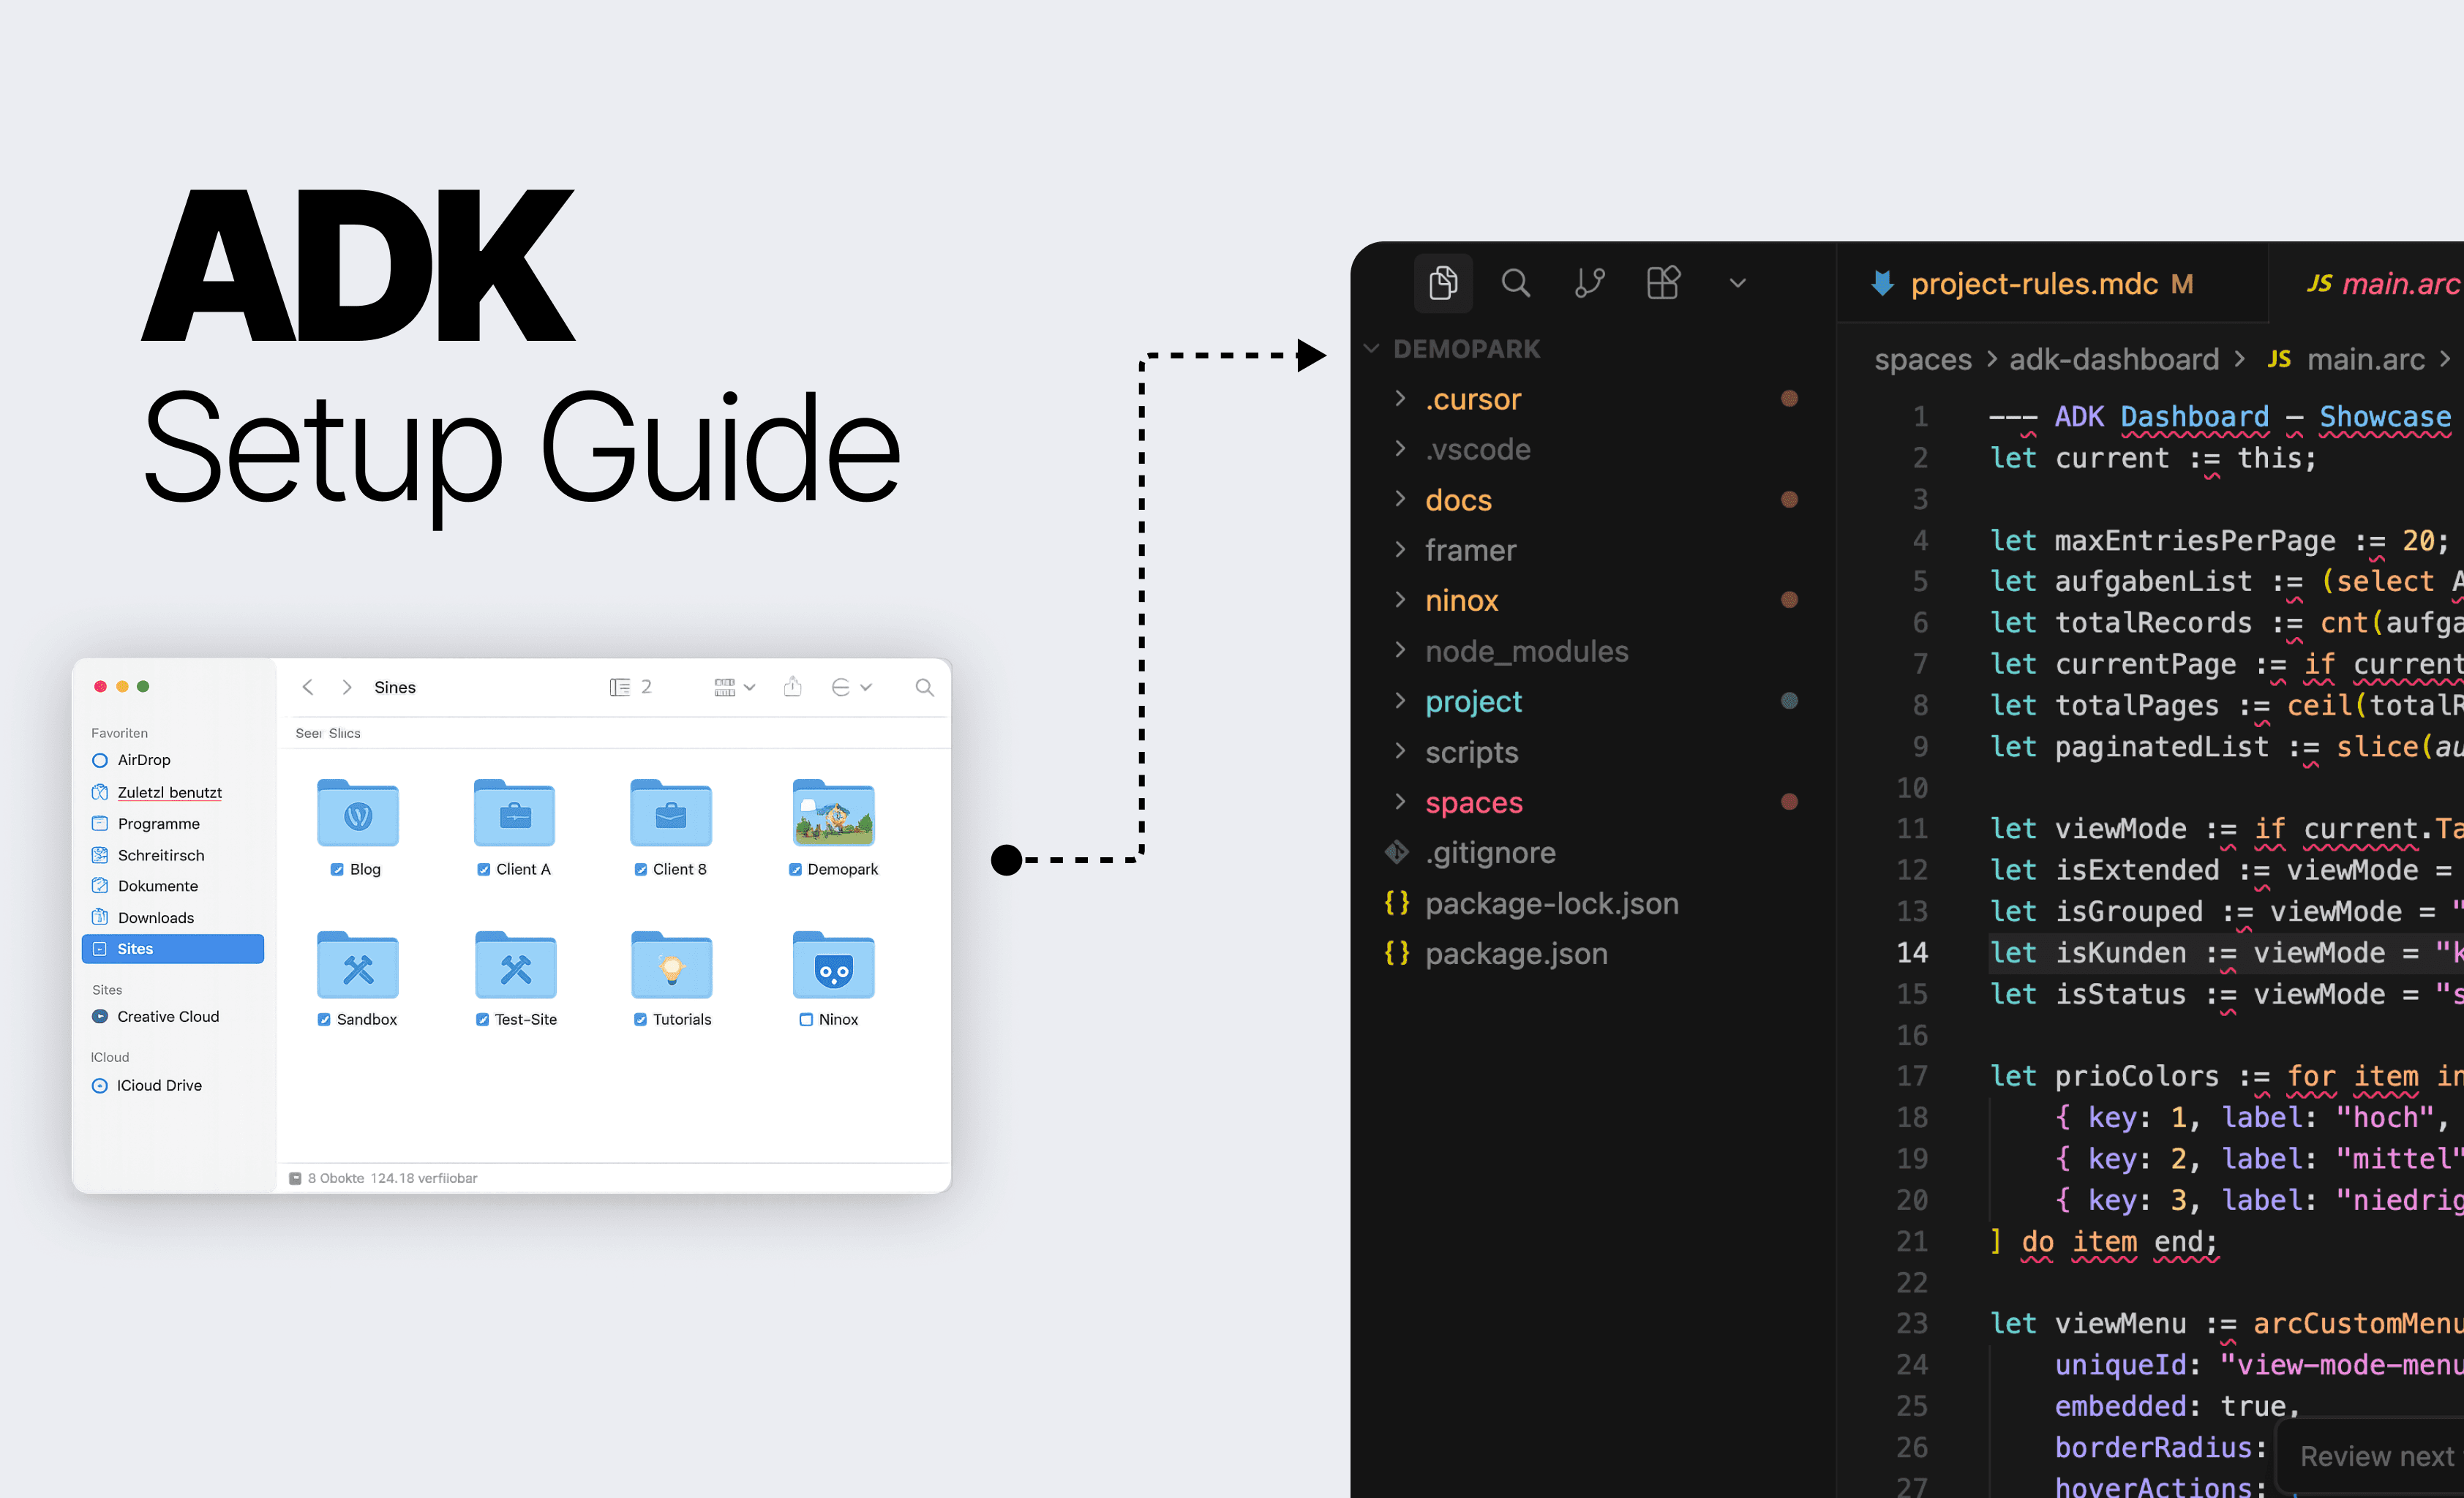
ADK Setup Guide
Your AI editor now knows your Ninox database – Setup in 10 minutes
Do you create Ninox interfaces with Arc Rider Widgets and wish that someone would help you with coding? Someone who knows your database, masters the correct syntax, and knows how the widgets work?
That's exactly what the Arc Rider Developer Kit (ADK) does. It connects an AI editor with your Ninox database and our widget documentation. You describe in plain languang what you want – the AI writes the code.
No programming skills required. No terminal knowledge needed. In this guide, we will walk through each step together.
What you will have at the end
After this guide, you will have a project folder on your computer with everything the AI needs:
The AI reads these files automatically in the background. You don't need to worry – you simply describe what you want to build, and the AI uses the context.
Requirements
Before you start, you need:
Ninox account with active Arc Rider Widgets – Order Widgets
Node.js (version 18+) – a free utility we need for installation – Download
Node.js is a widely used tool that developers use to install programs and packages. You only need to install it once – everything runs in the background afterward. Just download the "LTS" version from the website and follow the installer.
Step 1: Install Cursor – your AI editor
Cursor is a code editor with built-in AI. You can think of Cursor as an intelligent notebook for code: You write what you want – and the AI helps you implement it.
Why Cursor?
Local on your computer: Cursor is a program that runs on your computer. Your files stay with you – nothing is uploaded to the cloud.
AI understands context: Unlike ChatGPT or similar tools, Cursor can read the files in your project. If your Ninox schema is local, the AI knows your tables and fields.
No programming knowledge needed: You describe in German what you want to build. The AI writes the code, and you copy it to Ninox.
Free version is sufficient: You don't need a subscription to get started.
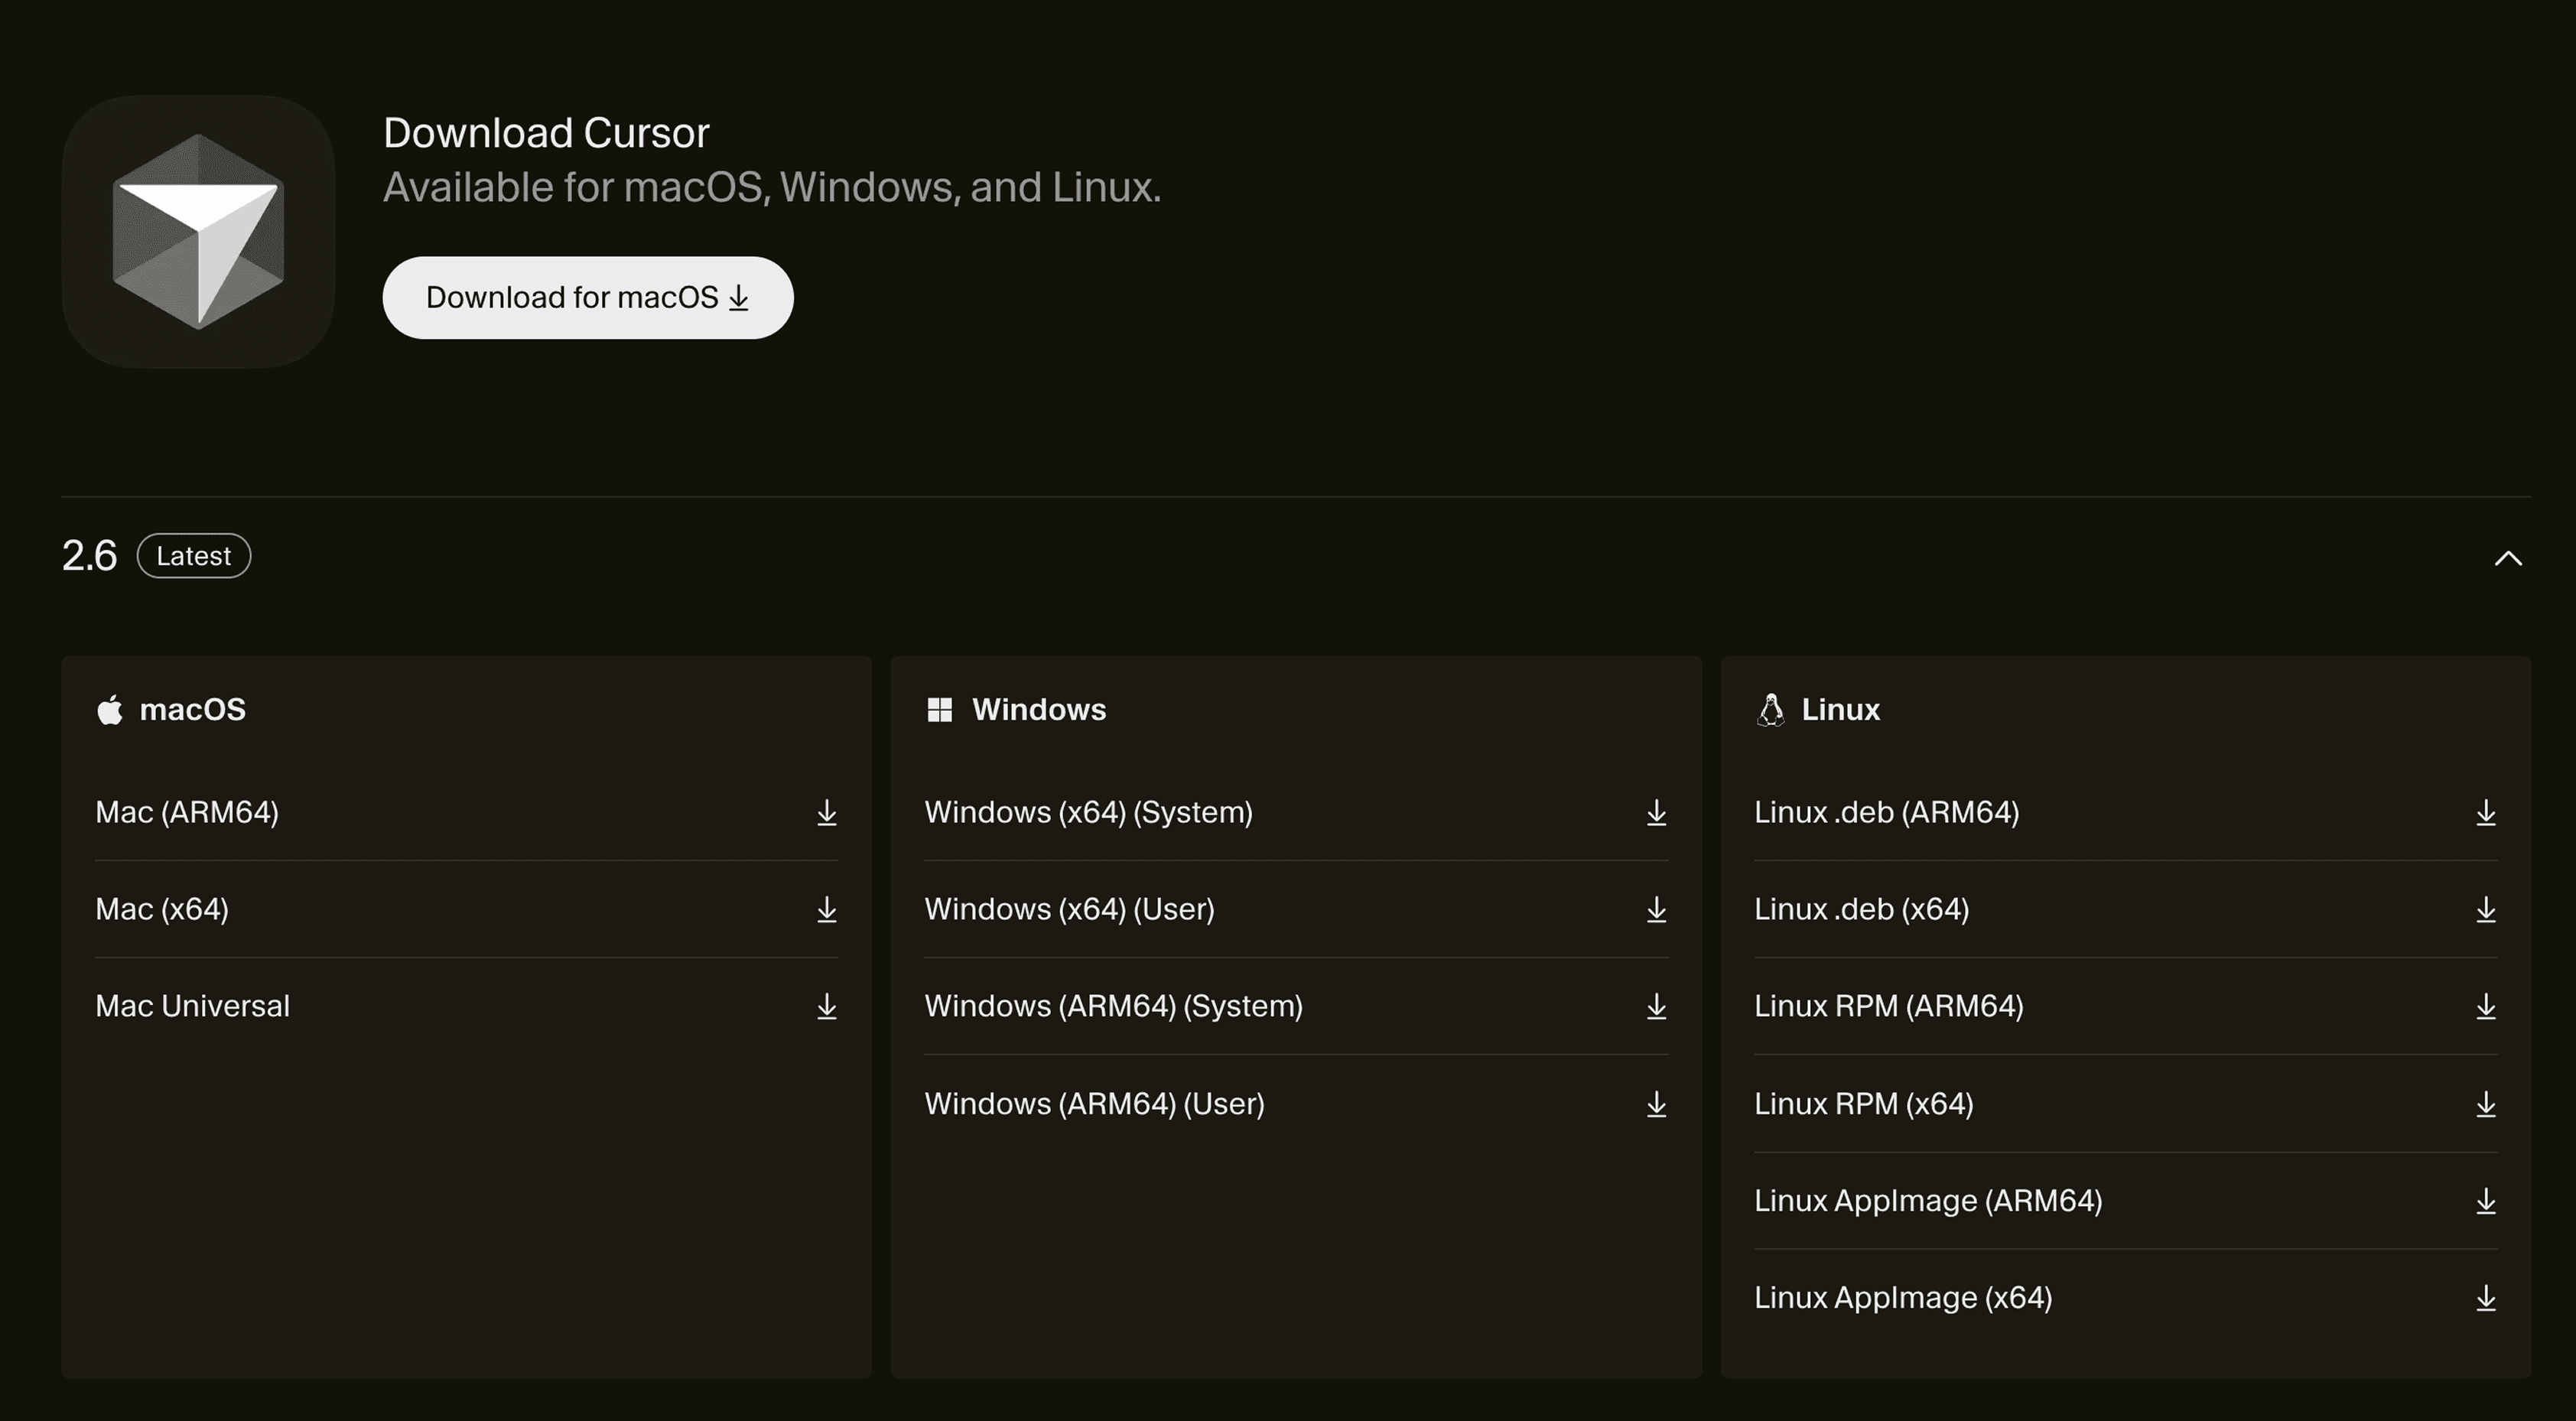
How to install Cursor:
Go to cursor.com
Download the version for your operating system
Install the program (like any other app)
Create a free account
Step 2: Create a project folder
Create a new, empty folder – where you usually save your projects. On Mac, we like to use the pre-made system folder “Sites” (e.g., /Users/yourname/Sites/).
Mac: Finder → Open folder “Sites” (or another location) → Right-click → “New Folder” → e.g., mein-ninox-projekt Windows: Right-click in Explorer → “New” → “Folder” → e.g., mein-ninox-projekt
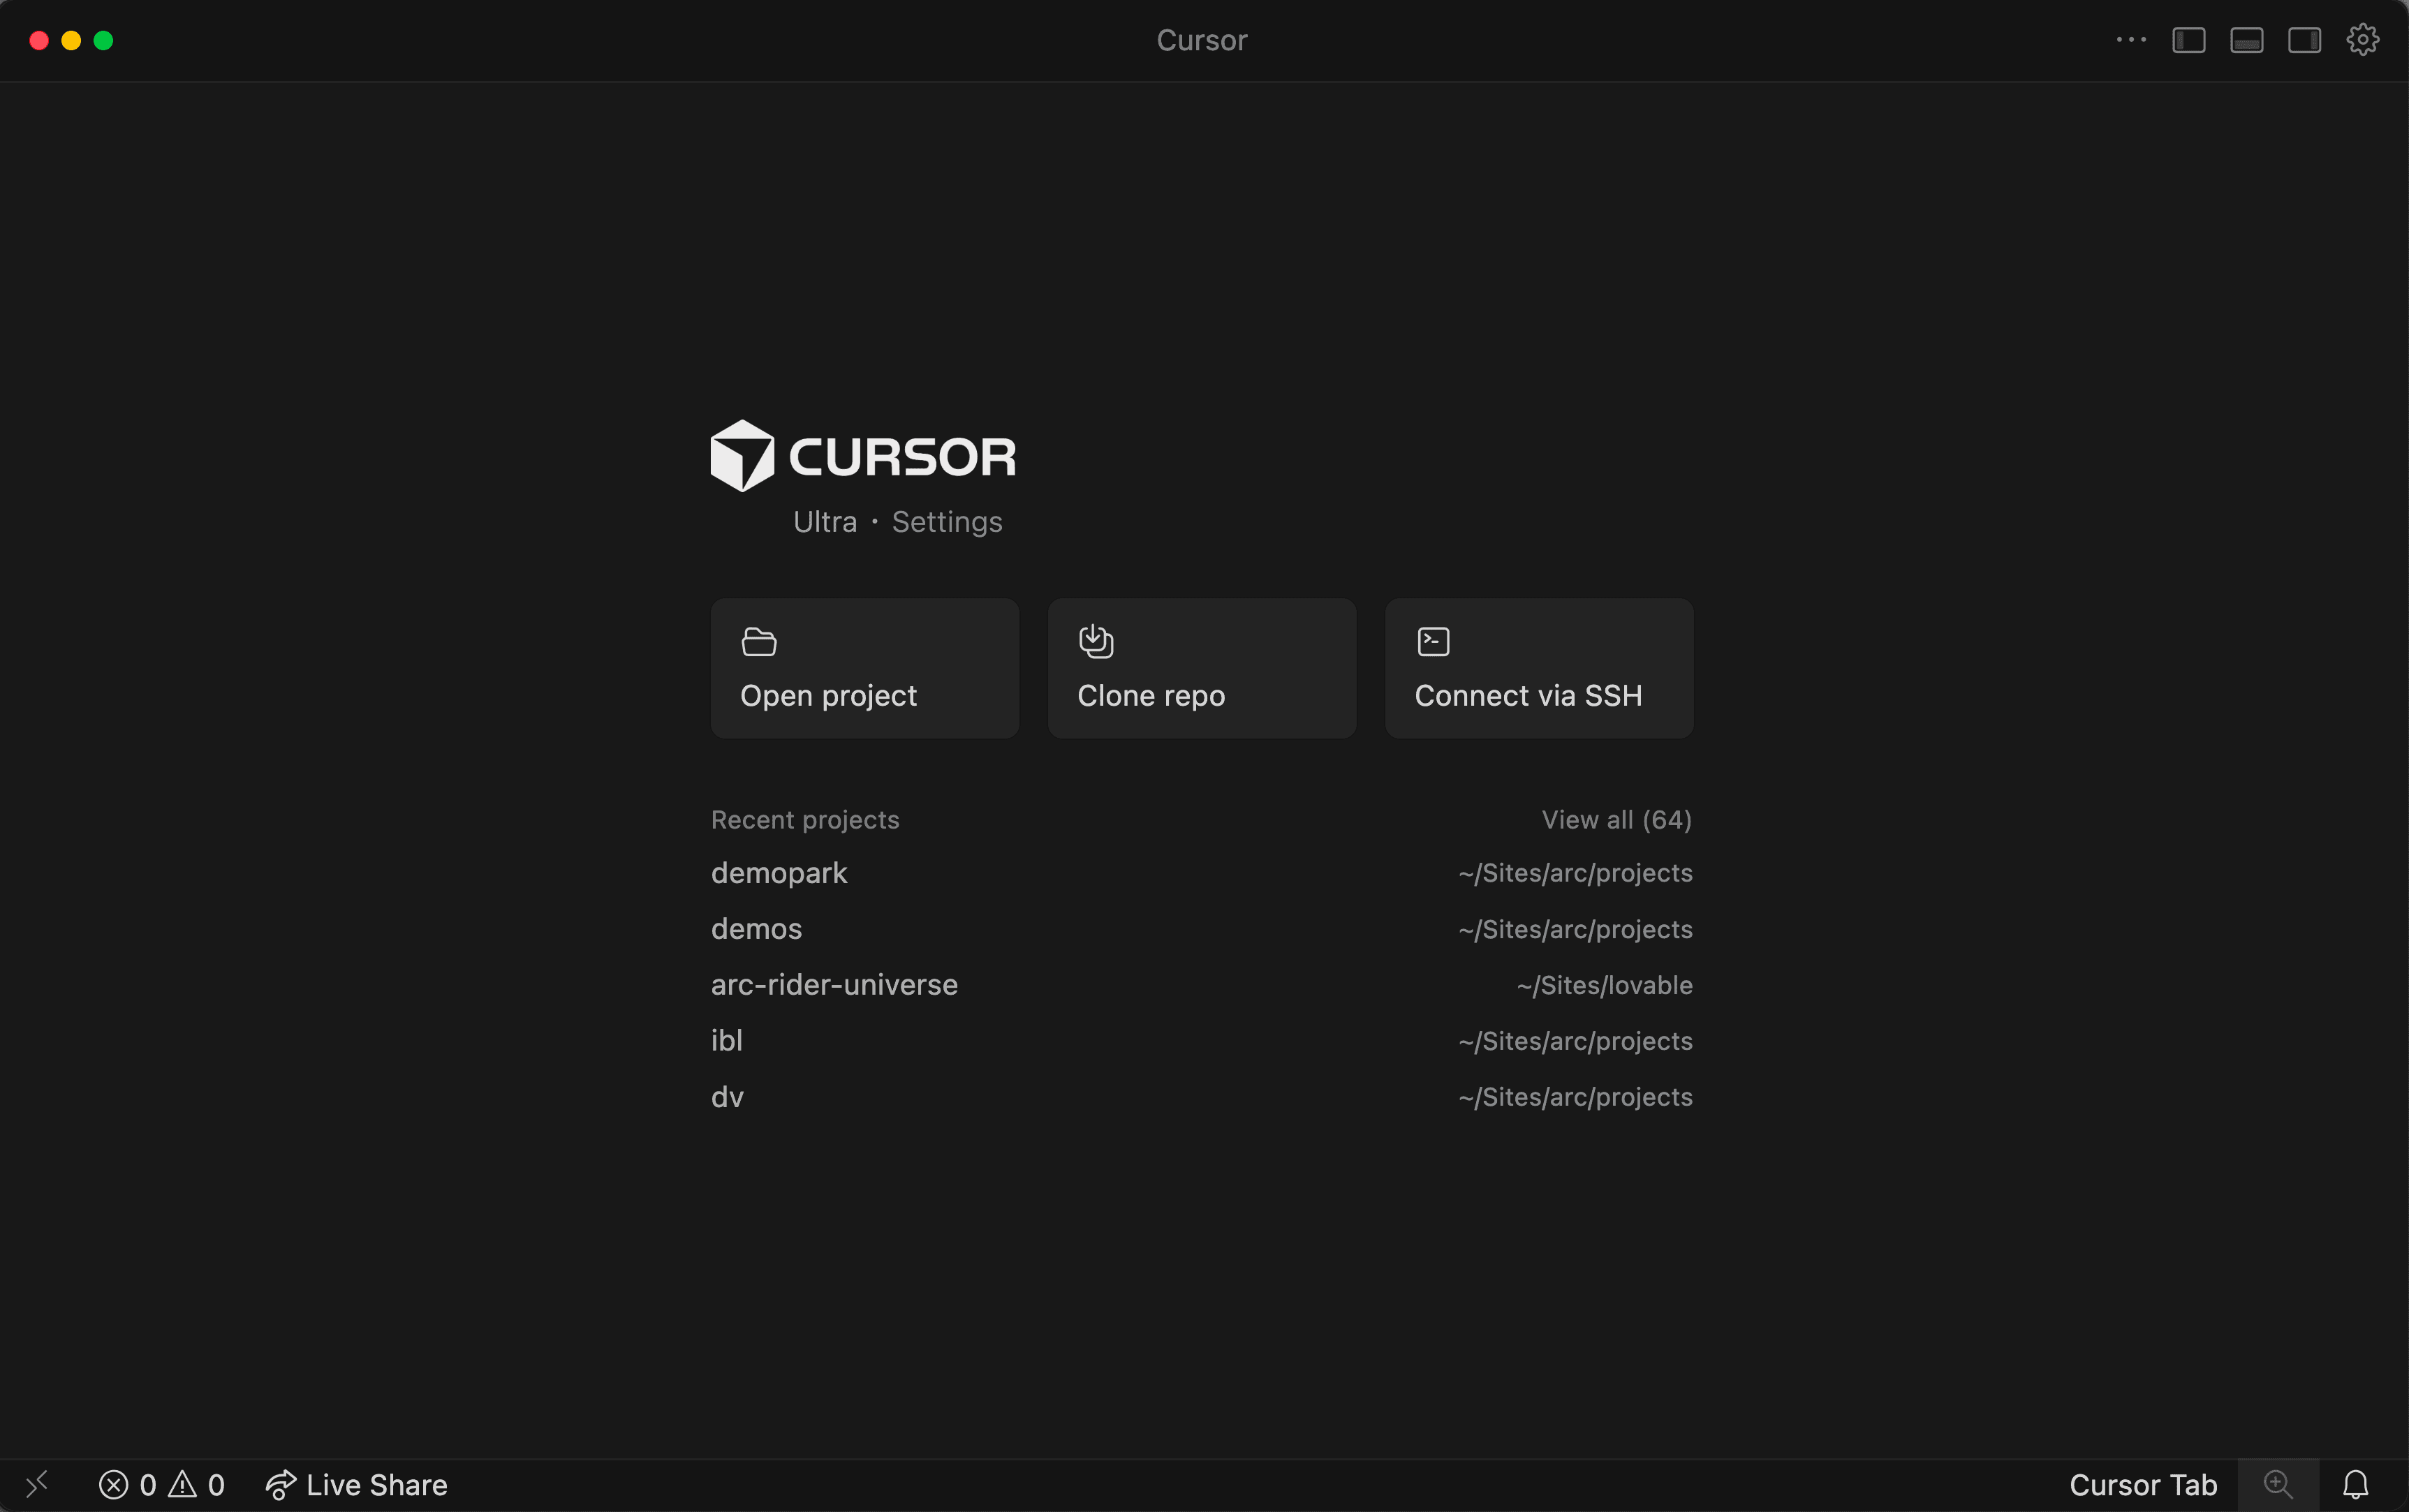
Open this folder now in Cursor:
Start Cursor
Go to File → Open Folder (or simply drag the folder into the Cursor window)
Select your new folder
Step 3: Install packages & set up the project
Now we install the ADK and set up the project. To do this, open the Terminal in Cursor – it's a command line built directly into the editor:
Mac: Press
Ctrl + Backtick(```) or go to Terminal → New Terminal in the menuWindows: Same key combination or via the menu
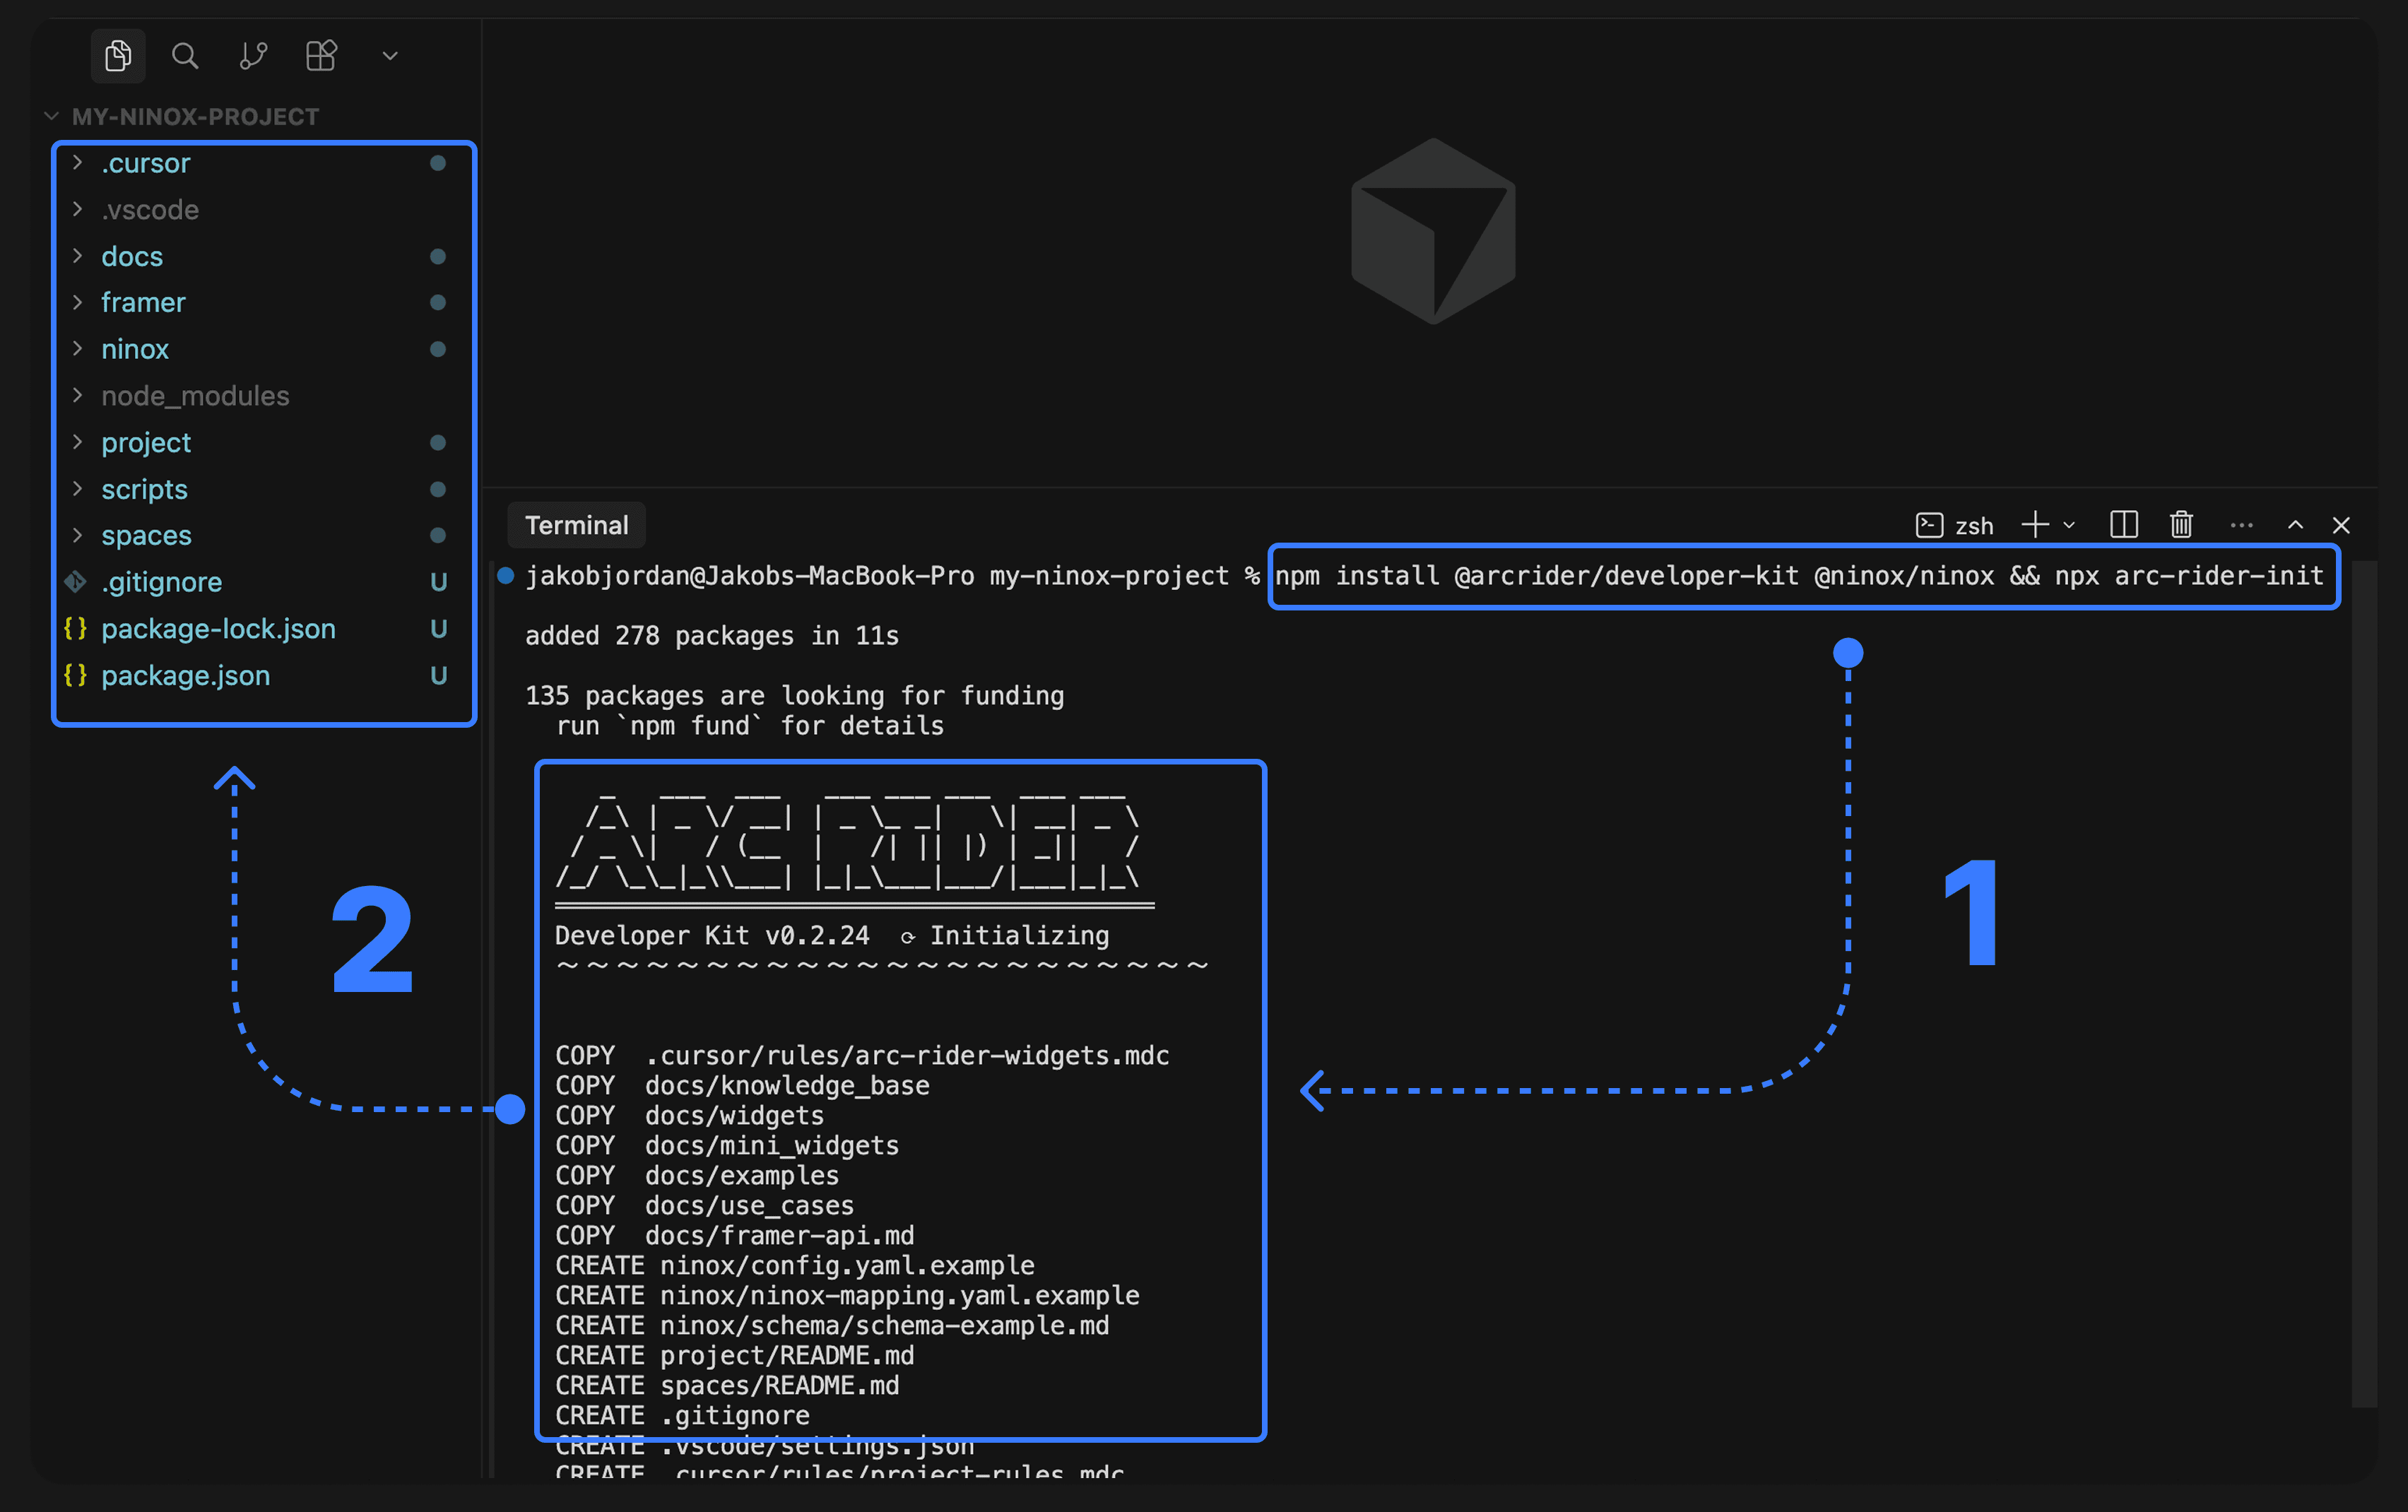
Enter the following command and press Enter:
What happens here?
npm installdownloads two packages:**@arcrider/developer-kit** – our widget documentation, AI rules, and reference implementations**@ninox/ninox** – the official Ninox tool for downloading your database schema
arc-rider-initthen automatically sets up the project structure:**.cursor/rules/** – AI rules for NinoxScript syntax and widget properties**docs/**– Complete widget reference (every widget, every property, every valid value)**ninox/**– Your database schema will soon be here**spaces/**– This is where your widget configurations land (e.g.,spaces/dashboard/main.arc)
It takes a moment. Then look at the sidebar in Cursor – you see the new folders.
Step 4: Configure Ninox access data
Now we connect the setup with your Ninox database. To do this, you need three things from Ninox:
Create API key
Open your Ninox instance in the browser
Click on your profile icon at the top right
Go to “Settings” → “API Keys”
Click on “Create new API key”
Copy the key and save it securely – you will need it shortly for the configuration
⚠️ Security: API keys give full access to your Ninox data. Never share them publicly, do not save them in screenshots or shared documents. The
config.yamlwith your key is only stored locally on your computer and is not committed to Git.
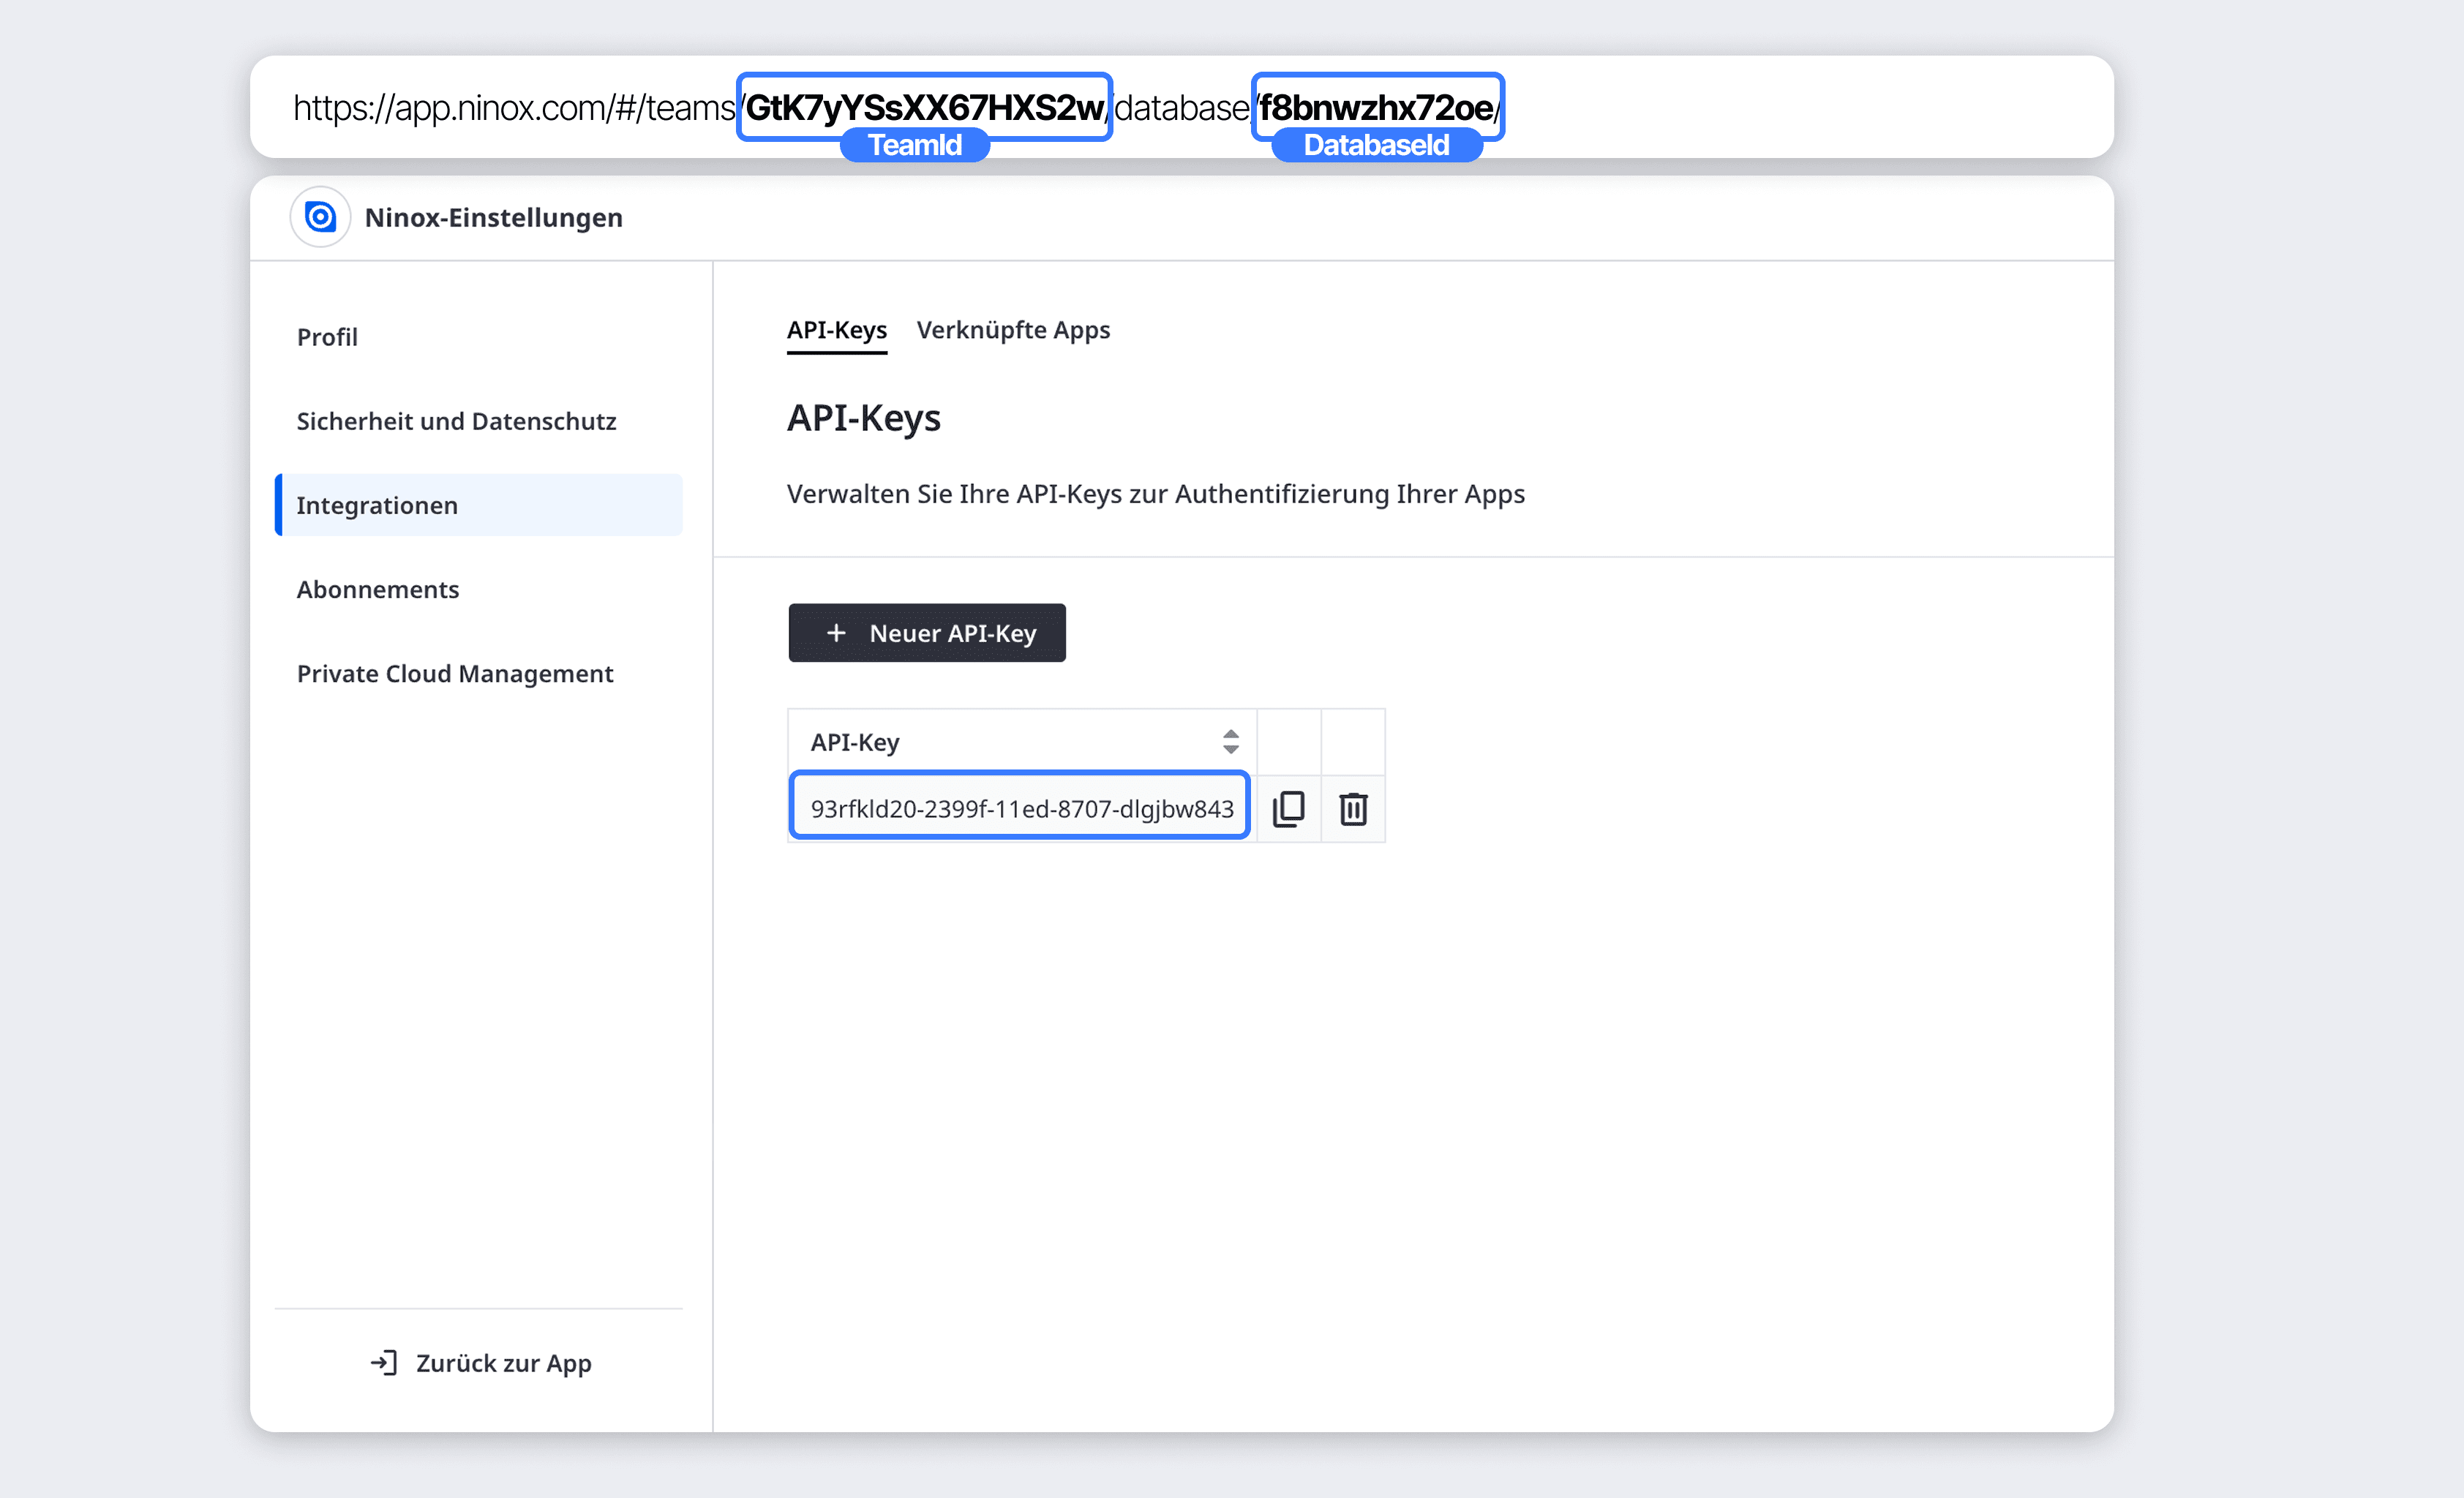
Find domain, workspace ID, and database ID
You can find the workspace ID and database ID in the browser URL when you open your Ninox database:
Public cloud (app.ninox.com):
URL example:
https://app.ninox.com/#/teams/Xk7mNpQr2sT4wYz/database/a9b3c7d2e1f/Workspace ID: The part after
teams/(e.g.,Xk7mNpQr2sT4wYz)Database ID: The part after
database/(e.g.,a9b3c7d2e1f)Domain in the config: Always
https://api.ninox.com(not app.ninox.com – that's just the web interface)
Private cloud (own Ninox instance):
URL example:
https://mycompany.ninoxdb.com/#/teams/abc123/database/xyz789/Domain in the config: Your API URL, e.g.,
https://mycompany.ninoxdb.comWorkspace ID: The part after
teams/(e.g.,abc123)Database ID: The part after
database/(e.g.,xyz789)
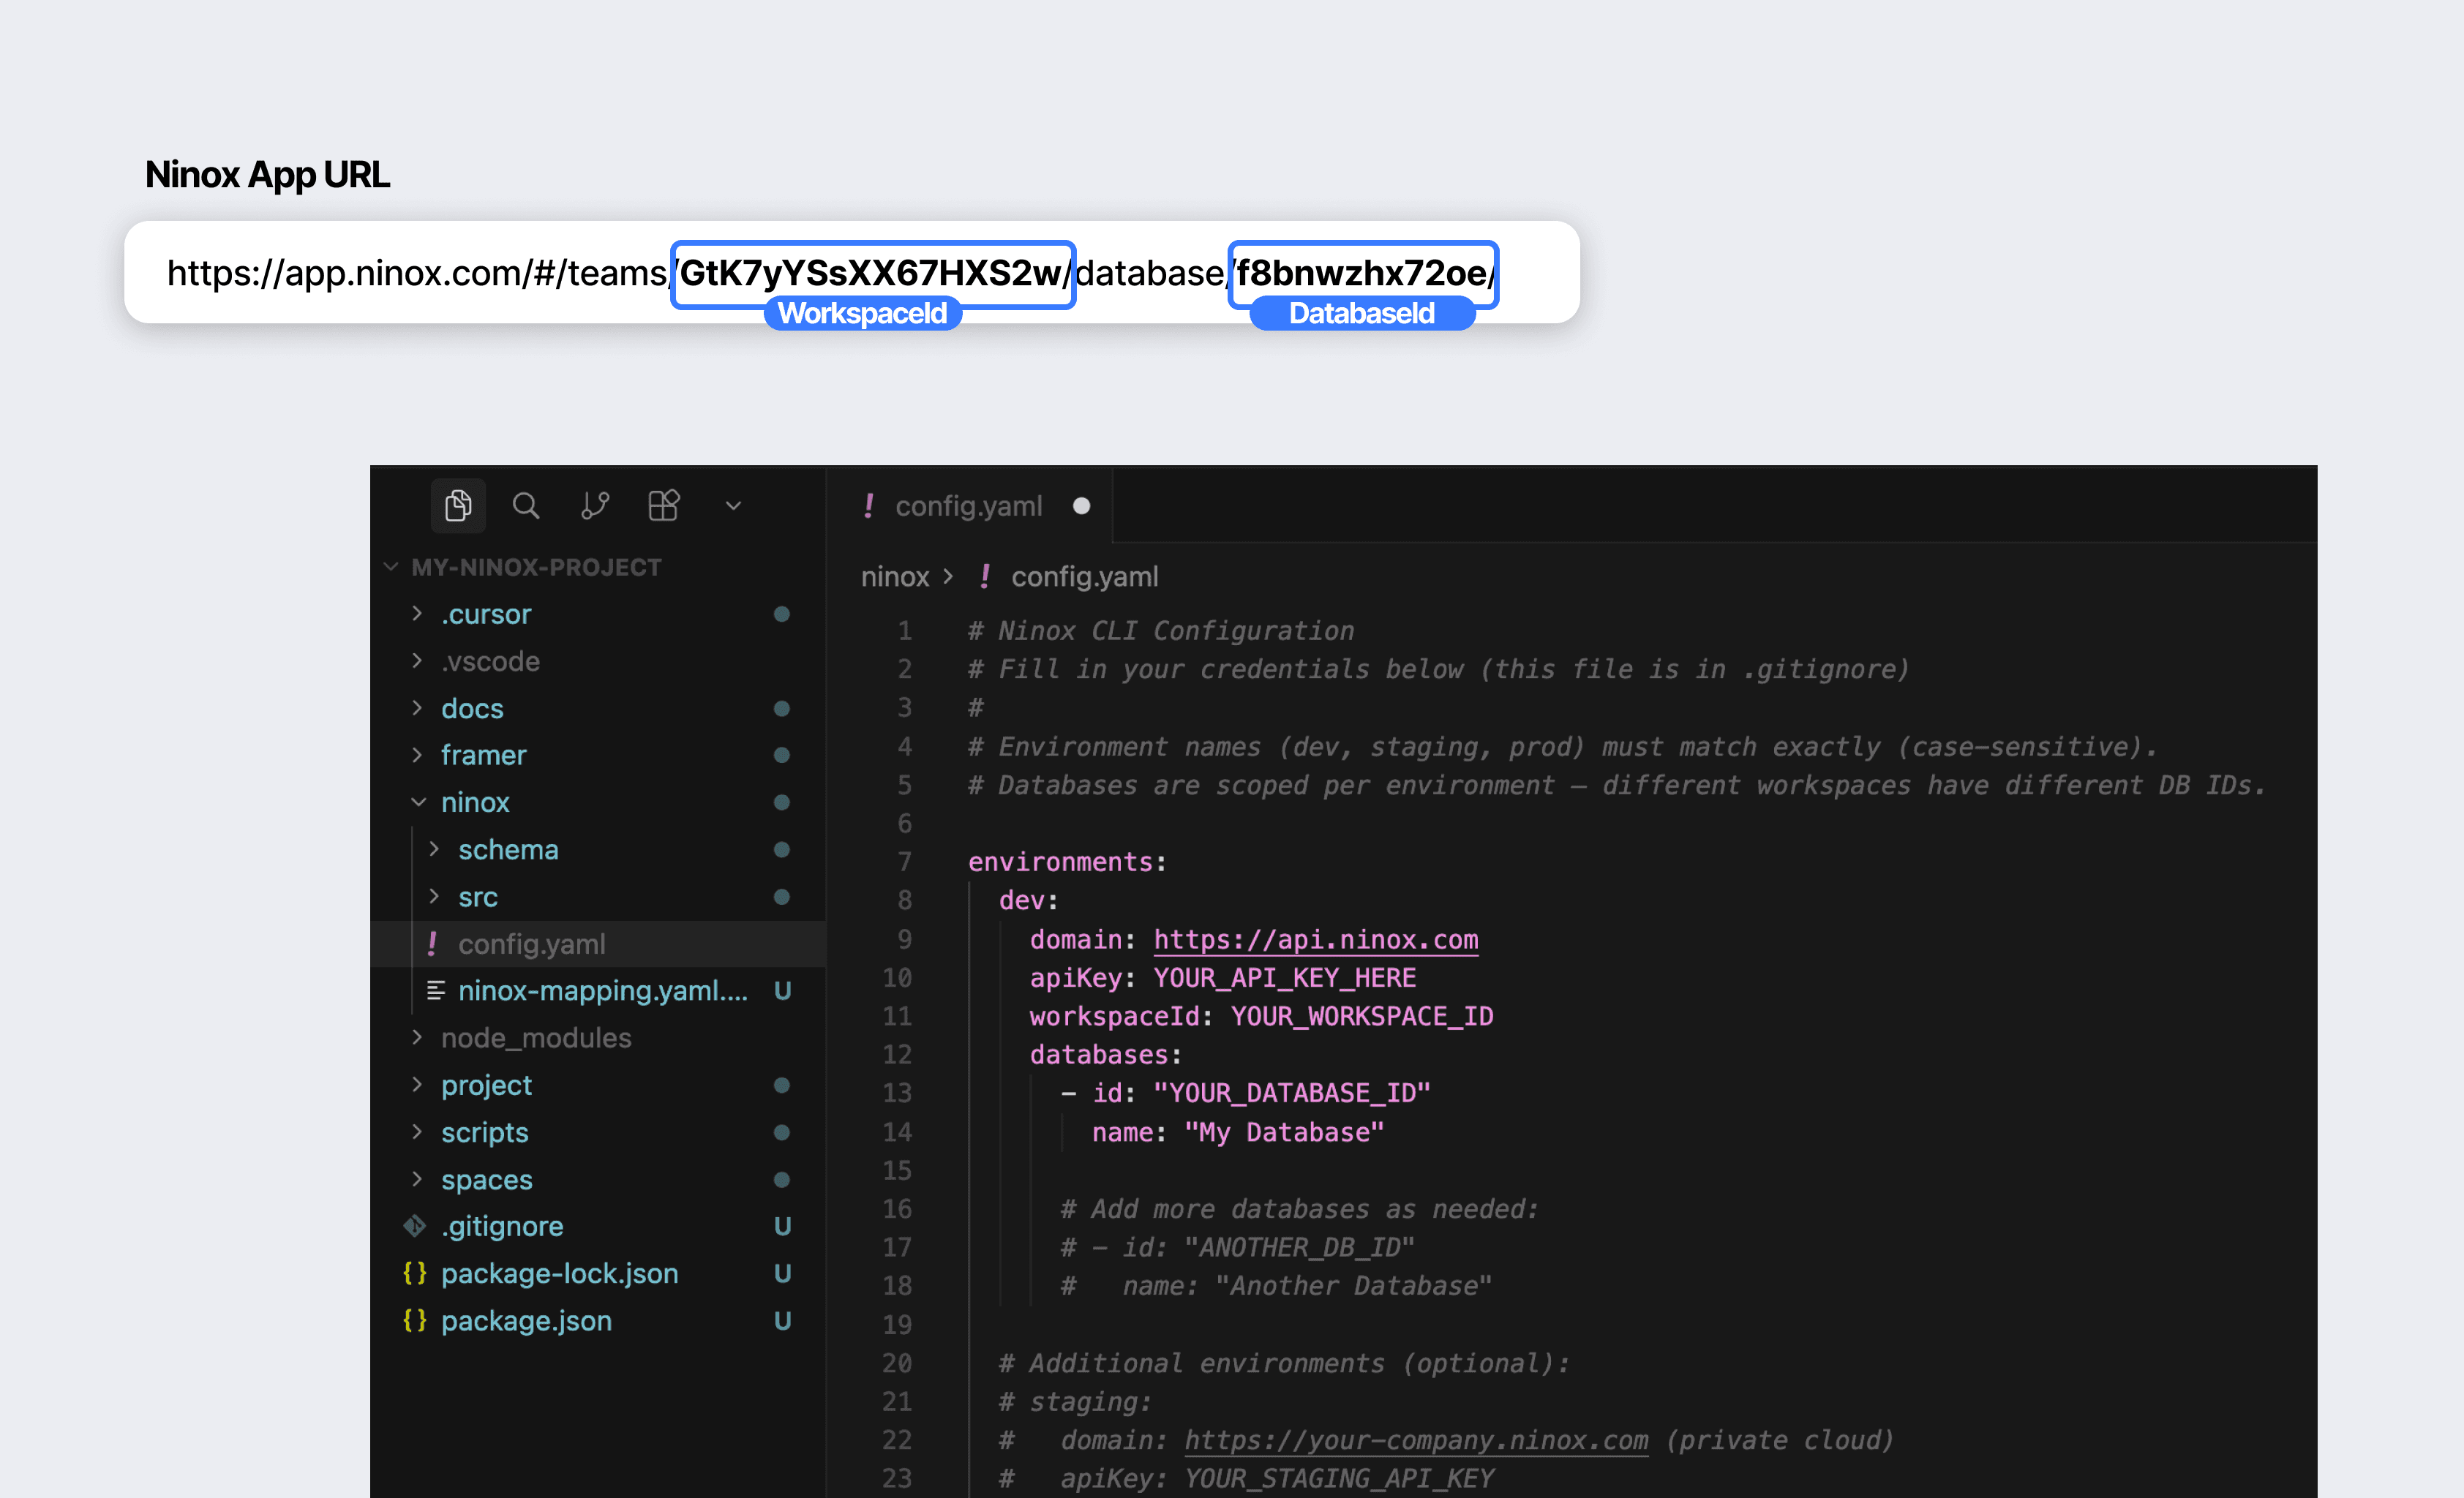
Fill out the configuration file
The file ninox/config.yaml was already created by arc-rider-init. Open it in Cursor (click in the sidebar) and enter your data under environments.dev:
Note on the domain: In the browser URL, you see app.ninox.com – that's the web interface. For the API configuration, you use https://api.ninox.com (public cloud). For private cloud: https://yourcompany.ninoxdb.com or your own API URL.
⚠️ Important: The
config.yamlcontains your API key and is never shared or uploaded – it is automatically protected.
Step 5: Download database schema
Now comes the magical moment. Type in the terminal:
If you have multiple databases in the config, a selection menu will appear – choose the desired database. If you have only one database, it will be automatically selected. Optionally, you can specify a particular database with --db=YOUR_DB_ID.
This command downloads your entire database schema – as readable files on your computer. Afterwards, under ninox/src/Objects/ you'll find a file for each table with all fields, field types, and relations.
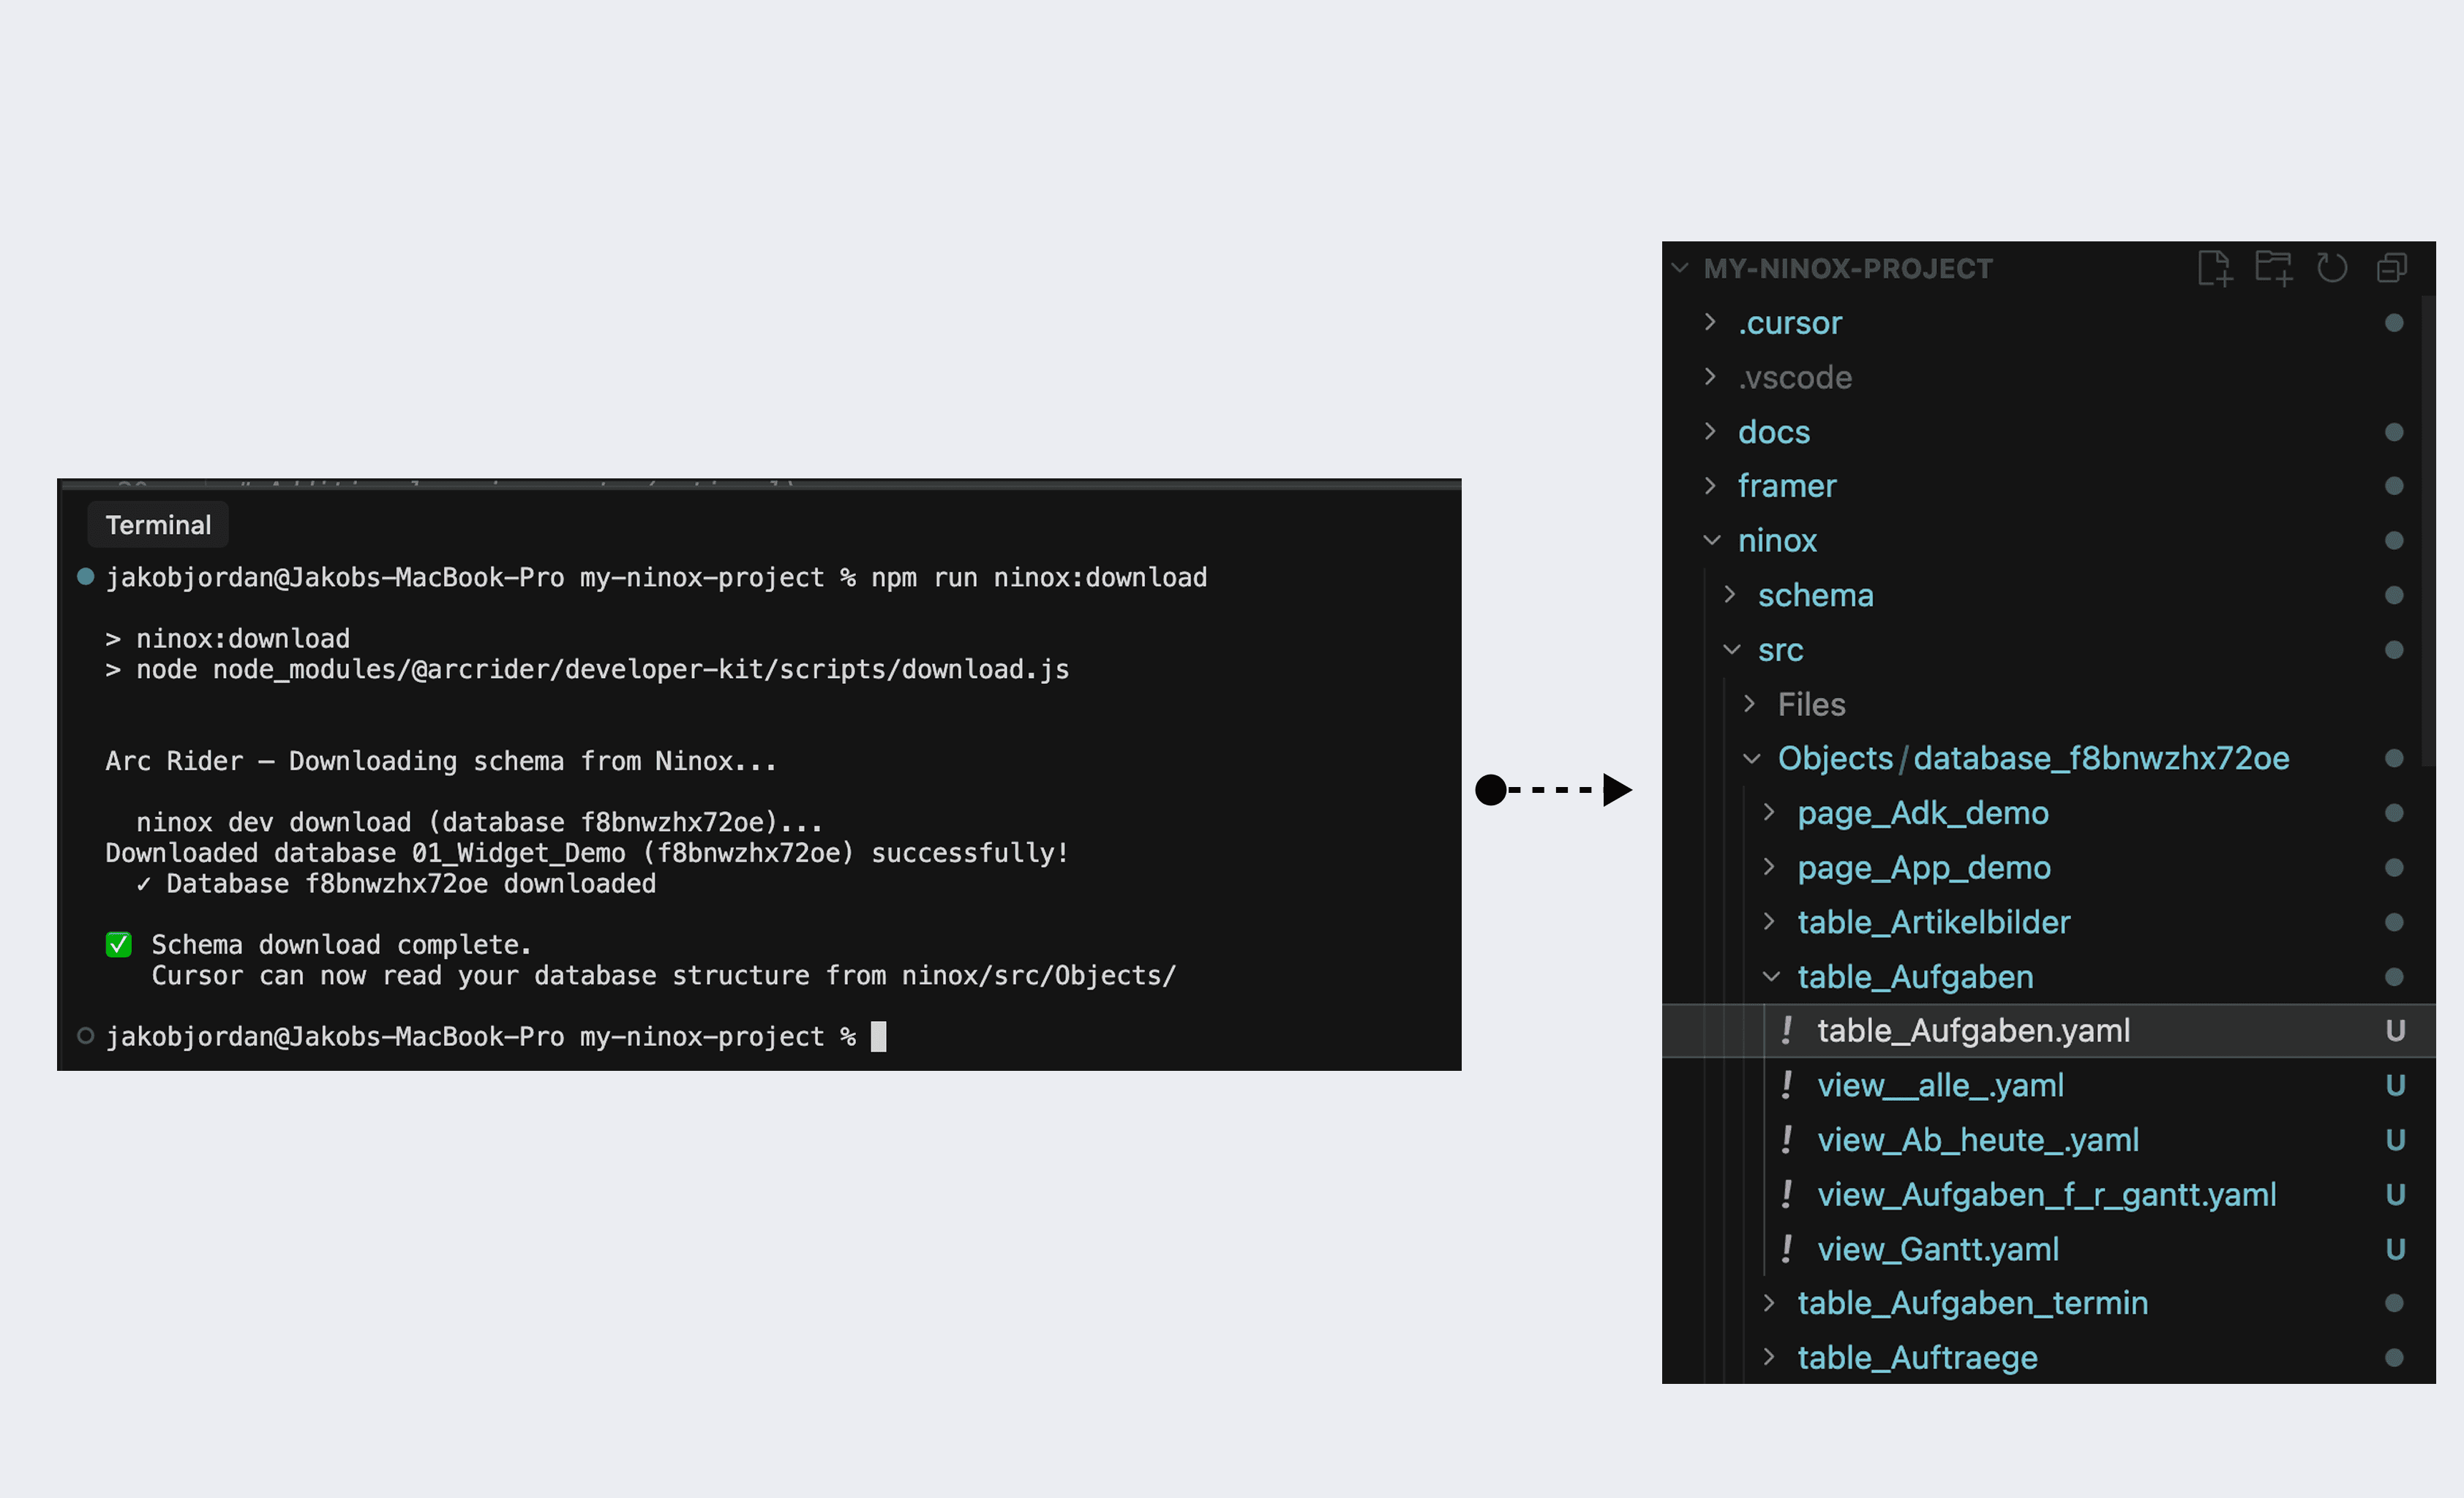
What just happened: Your AI editor can now read these files. It knows:
All table names (exactly as they are called in Ninox)
All field names and their types (text, number, date, selection, link)
All relations between tables
No more hallucinated field names. The AI knows that your field is called "Priorität" – not "Priority".
Done! Your first prompt
Open the Cursor Agent (Cmd+L on Mac, Ctrl+L on Windows) and try it out:
The AI then creates a new folder spaces/dashboard/ with a main.arc file – your widget code. Here's how the structure looks:
Each feature gets its own Space – this keeps your widget codes neatly organized. The shared/ directory is used for colors, fonts, and reusable building blocks that are used in multiple Spaces.

What the AI now does automatically:
Reads the AI rules → knows NinoxScript syntax (no JavaScript errors)
Reads your Ninox schema → uses the exact field and table names
References the widget docs → generates valid widget configurations
Uses reference implementations as a template → consistent, proven code
Saves the code in
spaces/→ organized by feature
Insert code into Ninox
Bring the generated code from spaces/dashboard/main.arc to Ninox:
Open the file
spaces/dashboard/main.arcin CursorSelect all code (Cmd+A / Ctrl+A) and copy it (Cmd+C / Ctrl+C)
Open (or create) a function field in Ninox – where the widget should appear
Paste code
Done – the widget appears
Advanced: Push code via CLI
If you feel comfortable with the terminal, you can also push code directly from Cursor to Ninox without copy & paste. To do this, configure a mapping in ninox/ninox-mapping.yaml and use npm run ninox:push.
⚠️ Note: The Ninox CLI can also upload schema changes (
ninox:upload). This directly changes your database structure. Use this function only if you know exactly what you're doing – schema changes via the CLI can jeopardize data if applied incorrectly. For the normal widget workflow, you only needninox:download(read) andninox:push(write code to a form field).
Tips for better prompts
Be specific with tables and fields:
Reference existing templates:
Describe the design:
Iterate step-by-step:
Frequently asked questions
Do I need to know how to program? No. You describe to the AI in German what you want. It writes the code. You just need to formulate the prompt and insert the code into Ninox.
What is npm? npm (Node Package Manager) is a tool that comes with Node.js. It works similarly to an App Store: With a short command in the terminal, you download and install packages (software components). You only need npm for the setup – afterward, you work normally in Cursor.
Do I need the paid Cursor version? No, the free version is sufficient for starting out. The Pro version offers more AI requests per month.
What happens if my schema changes? If you add or change tables or fields in Ninox, simply run npm run ninox:download --db=YOUR_DB_ID again. The schema will be updated and the AI will know the new fields.
Does this work without Arc Rider widgets? The ADK is specially developed for Arc Rider widgets. Without the widgets, the so-called global code in Ninox is missing – the technical foundation on which the generated widget configurations are built. Therefore, you need an active widget subscription. If you do not have widgets yet, you can order them here: Arc Rider Widget Store
Summary
Step | What happens | Duration |
|---|---|---|
1. Install Cursor | Download AI editor | 2 Min |
2. Create folder | Create new folder in Finder/Explorer | 30 Sec |
3. Install & set up packages | Install ADK + create project structure | 2 Min |
4. Enter access data | API key, domain, workspace ID | 3 Min |
5. Load schema | Download database structure | 1 Min |
First prompt | AI generates widget code | Immediately |
Two commands in the terminal – the rest happens automatically:
Your AI editor now knows your database, your widgets, and the correct syntax.
Enjoy building. 🌊